How To: The Definitive Nexus 7 Guide to Bootloader Unlocking, Rooting, & Installing Custom Recoveries
Rooting, bootloaders, custom ROMs, CyanogenMod, ClockworkMod... it's all pretty confusing, isn't it? You're not the only one having trouble with this. Many users in the Nexus 7 SoftModder forum have been scratching their heads at these many terms.First, let's cover the terms, so we can get that out of the way.
The Most Frequently Used Terms You NEED to Knowbootloader: A bootloader is what tells your Nexus 7 what things to load when you first turn it on. Think of it as a set of instructions for what switches to be switched on and in what order. Unlocking bootloader: Unlocking a bootloader is allowing your Nexus 7 to load or switch on whatever it wants when it boots up. Bootloaders come locked out of the box to prevent unwanted tinkering; unlocking it will allow for custom ROMs on your Nexus 7. Rooting: Rooting is gaining access to parts of Android you normally not allowed in. Think of it as kicking down doors at the office that say "Restricted: VIPs Only". Once rooted, your Nexus 7 can run cool and innovative apps that require all doors to be opened to work. Custom recovery: Used to install custom ROMs on your Nexus 7. It's also used as an option to restore your device to stock when things go awry. It's the most used tool in custom ROMs. Popular custom recoveries are ClockworkMod (CWM) and Team Win Recovery Project (TWRP) which uses a touch-only interface to install ROMs, making it a super easy process. Flashing: Flashing is simply the process of installing a custom ROM (or even a stock ROM) onto your device. Whew! Okay, now you know that basic terms. Great!
Breaking Free of Your Stock Android SystemSo, now how can you finally break free from your stock Android OS on your Nexus 7 and explore the ultimate customization options available?The rest of this article will cover how to get the most out of your Nexus 7 tablet and guide you through the process of prepping your Nexus 7 for custom ROMs using a Windows computer. Adding a custom ROM onto your Nexus 7 will increased speed, give you better performance, and more. So, let's begin!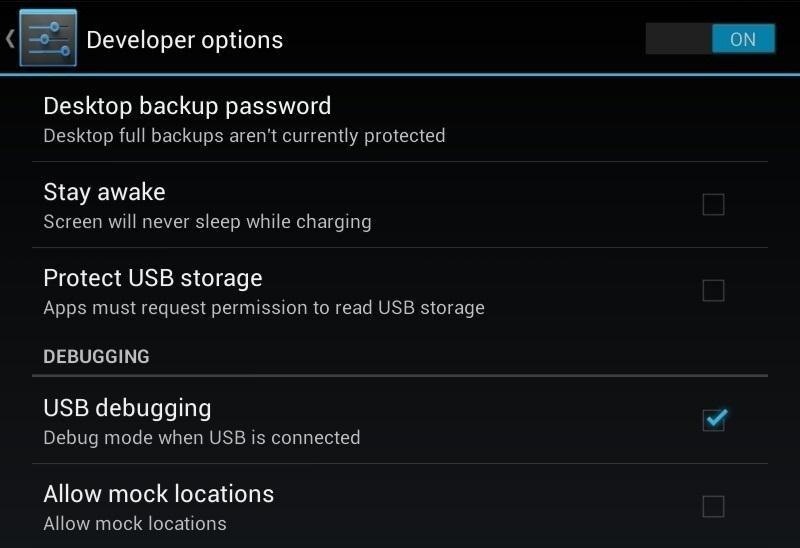
Step 1: Enable USB DebuggingBegin by enabling "USB debugging" on your Nexus 7. This is the most important step because the toolkit will automate everything for you. Enable "USB debugging" by going to Settings -> Developer Options -> USB Debugging. Note: If there is no "Developer Options" shown in "Settings" menu, you can unhide it by going to Settings -> About Tablet -> Build Number and tapping on that 7 times to unlock it. This is something Google started implementing in Jelly Bean 4.2 and higher.Once enabled, plug your Nexus 7 into your computer using the USB cable that came with your tablet. Don't remove the USB cable from your Nexus 7 unless the toolkit tells you to do so later.
Step 2: Toolkit Time!On your PC, begin by downloading the Nexus 7 Root Toolkit. Install the toolkit by clicking "Next" through the various prompts.Once the installation is complete, go ahead and run the toolkit. A window will pop up asking for your device model. Choose your device from the list along with its OS version and click "Apply". Head over to "Initial Setup" and click "Full Driver Installation..." Follow the guide provided in the toolkit to install the required drivers for your Nexus 7. I recommend "Driver Solution #3", but any of the three options should work. The toolkit has a built-in guide with pictures that will aid you in installing the drivers. Now with the drivers installed, make sure they're working by testing them over in the "Step 3" tab. The toolkit will verify if the drivers are properly installed and working.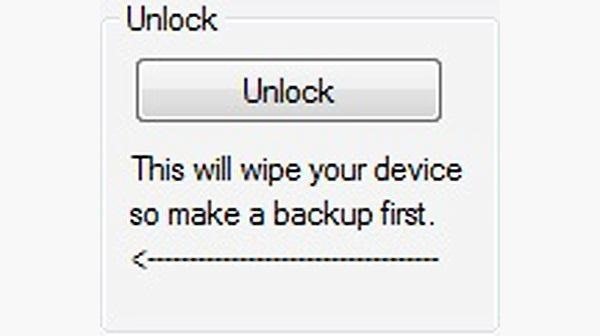
Step 3: Unlocking the BootloaderClick on "Unlock" to unlock the bootloader. Everything will be automated, so just follow its lead. THIS DELETES EVERYTHING ON YOUR NEXUS 7—back up everything important.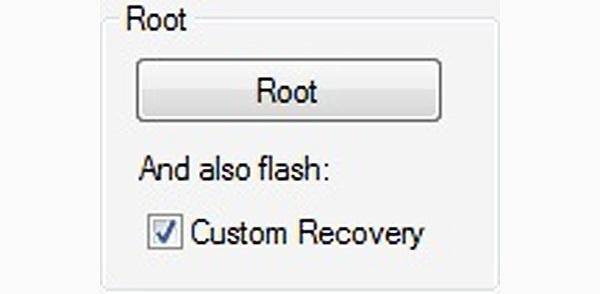
Step 4: Rooting and Custom RecoveryWith the bootloader unlocked, head over to "Root" to root your tablet. Check the option for "Custom Recovery" to have TWRP installed. Then click "Root" to begin the process.
Step 5: Custom ROMsUsing a web browser on your PC, download the custom ROM you want to use. As an example, I will be installing the CyanogenMod ROM, but the process is the same for any custom ROM of your choosing. The latest version of CyanogenMod for the Nexus 7 can be downloaded from this page.CyanogenMod also requires Google Apps (GApps), so grab the latest version here.Now, let's head back over to the toolkit. With the toolkit opened up on your PC, click the button for "Launch" in Advanced Utilities. A very large list will pop up, but what you want to focus on is the section called "Flash Zips". Choose the option for "File is on this computer" and press "Flash zip...". A new window will open for flashing ROMs. Add the two zips files you downloaded earlier by clicking "Add zip's to flash...". CyanogenMod should be selected first, followed by GApps, so they flash in that order. With the files added, go over to "Wipe selected partitions..." and check the boxes for "Enable" including the boxes for "Data", "Cache" and "Dalvik".This ensures your old OS will be deleted before installing the new custom ROM. Click "Confirm operation" to begin flashing. Just sit back and let the toolkit automate the flashing process for you. Once complete, your Nexus 7 will boot up into the new custom ROM that was installed! You can now unplug the USB cable if you want.Here is CyanogenMod booted up for the very first time. Now, tell us if it worked for you!
Aug 28, 2017 · Your smartphone got wet. Here's what not to do first. Experts say the first and most important thing is to turn the phone off. Don't be tempted to turn it on after a few hours or day.
WET cellphone fixed in 3 MINUTES !!!! ..not 3 days - YouTube
10 reasons why your Android battery is charging slowly and how to fix them good news! If your battery has gone bad, you can purchase a new one from Amazon and pop it into your phone right away
Explosions? Electrocution? Fatal phone accidents are rarer
Use a BlackBerry Curve 8330 cell phone - Gadget Hacks
#How to make #Pistol #Pen #Powerful #Simple #Toy Gun @ About GearMan Channel : This channel is all about DIY, How To, Home Made, Great Ideas, simple, funny and entertainment. @ WARNING : My videos are provided only for entertainment and watching purposes only. Please don't try to do what I did in my videos.
How To Make a simple & powerful Pen Gun - Pinterest
Recover your account. We can help you reset your password and security info. First, enter your Microsoft account and follow the instructions below.
Recovering a Forgotten Password for Your Account on PSN
How to Make a High Powered Pen Gun. This is how to make a high powered pen gun that can shoot straight through tomatoes and, if powerful enough, through an apple. Remove the ink cartridge and end of the pen. (hold onto the ink cartridge)
How to make a Pistol With a Pen - Powerful, Simple Toy Gun
How to enable JavaScript in your browser Nowadays almost all web pages contain JavaScript, a scripting programming language that runs on visitor's web browser. It makes web pages functional for specific purposes and if disabled for some reason, the content or the functionality of the web page can be limited or unavailable.
6 Instagram Hacks for Better Instagram Stories by Jenn Herman on Social Media Examiner. #1: Customize Font Colors. To add text to your Instagram stories, tap the Aa icon in the top-right corner when you take or upload a photo or video to your story. In the keyboard that opens, select from a range of colors. There are actually infinite color
Creative Secrets of Instagram Stories | Instagram for Business
To increase your productivity you need to increase Internet speed in Windows 10. After installing Windows 10, are you feeling that your Inter bandwidth is dropping away? If yes, that means your operating system is stealing your Internet speed. You can follow these optimization methods to improve internet connection.
How to Increase Wi-Fi Speed and Overall Wireless Quality
It's actually hard to imagine being able to use a computer without copy and paste. The iPhone (and iPad and iPod Touch) also has a copy and paste feature, but without an Edit menu at the top of every app like on macOS or Windows, it can be hard to find. This article shows you how to use copy and paste on the iPhone and other iOS devices.
How to Copy Files to and from Your iPhone - Make Tech Easier
Right now, the top way to use Photoshop without paying anything is to sign up for the free trial, and then cancel before that trial ends. (MacOS is now one 10.14 Mojave) can open up your Mac
5 Ways to Open a PSD File Without Photoshop - Tech Junkie
Tell Google Assistant 'I'm Feeling Lucky' for a Fun Easter Egg
0 comments:
Post a Comment